DWARF User Interface Tutorial
This tutorial will get you up and running with the DWARF User interface Components. You will learn how to use the DWARF.Viewer and DWARF.UserIntefaceController? how to add and controll objects in a 3D Scene and howto use Input devices in a DWARF environmentPrerequisites
For this tutorial, you should- have a running XFree configuration with 3D accleration. (more information Xfree.org),
- know what a Petri-Net is and make yourself comfortable with the Jfern framework,
- know the concepts of Scenegraphs as used in VRML or OpenInventor,
- know how to install DWARF on your system (see DwarfInstallTutorial),
- be able to use the build process for DWARF (see DwarfBuildTutorial),
- understand the functionallity of DWARF.Middleware (see DwarfMiddlewareTutorial),
- have read about the concepts of Services, Needs and Abilities (see our DwarfWhitePaper or "Design of a Component-Based Augmented Reality Framework in PublicationList).
- some of the lessons require special hardware/software (e.g. the ART-tracking system, a speechrecognition system ...)
Other Material
- UItutorialSTB.ppt: Powerpoint version of the DWARF UI tutorial. This version was written for a visit from the Studierstube.
Lesson 1: Learn to use the UserInterfaceController?
In this lesson you will learn how to use the ServiceUIC? in simple applications. In particular we will build a chain of three simple DWARF services to exchange messages.What the UserInterfaceController? is
The UserInterfaceController? is a important part of the DWARF.Userinterface Framework it handles incoming UserInput does a MediaAnalysis and controls the DWARF Output devices (e.g.: SoundService, Viewer). It is build on top of the rakiura JFern Framework, which is a pure java Petri-Net Framework. JFern allows us to describe Petri-Nets in xml and add native Java code to the transitions which is executed when the transition fires.What to build
Make sure you have a built and installed DWARF distribution. In particular, for this tutorial, you need:- TestStringSenderJAVA (in src/services/TestStringSenderJAVA)
- TestStringReceiver (in src/sevices/TestStringSend)
- Tutorial specific xmls (in src/tutorials/ui/tutorial1)
- UIC (in src/tutorials/ui/UIC)
Running the example
Go to your install directory.- In a terminal window, type
run-servicemgr. - In a new terminal type
java -jar TestStringSenderJAVA.jar - In a new terminal type
java -jar Tutorial_UIC.jar Tutorial1Net - In a new terminal type
./TestStringReceiver
 You also might want to have a look at the code in Tutorial1Net.xml
to get an idea how xml an java code work together.
Lesson 2: Learn to use the Viewer
In this lesson you will learn how to use the ServiceUIC? in combination with the Viewer. Basically we will, as in Lesson 1, receive String Events from ServiceTestStringSenderJAVA? and display them. This time we won't just print the received messages to the shell but overlay a 3D Scene with 2D Text in the Viewer. Also you will learn about the Commandline Parameters to use all the features of the ViewerWhat to build
Make sure you have a built and installed DWARF distribution. In particular, for this tutorial, you need:- TestStringSenderJAVA (in src/services/TestStringSenderJAVA)
- Viewer (in src/services/Viewer)
- Tutorial specific xmls (in src/tutorials/ui/tutorial2)
- UIC (in src/tutorials/ui/UIC)
Running the example
Go to your install directory.- In a terminal window, type
run-servicemgr. - In a new terminal type
java -jar TestStringSenderJAVA.jar - In a new terminal type
java -jar Tutorial_UIC.jar Tutorial2Net - In a new terminal type
Viewer

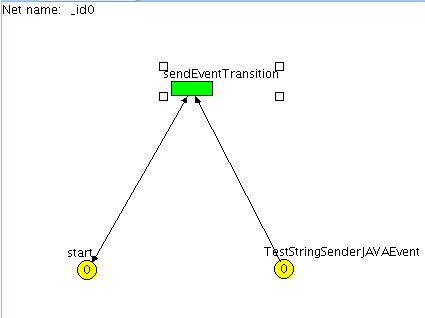
Now watch as the incoming messages are displayed as green tokens in the Petri-Net and and messages shown in Viewer.
again you might want to have a look at the Petri-Net description in Tutorial2Net.xml
Configuring the Viewer
The Viewer has a broad variety of features which can be enabled/disabled via Commandline Parameters (as stated here). you can enable/disable the features at startup of the viewer.- if you have standard red/cyan stereo glasses try this example with the option
-Dstereomode=anaglyphic(then you might use the ServiceManualTracker withThingID=HMD1andThingType=Viewpointto move the eyeposition). - if you have a HMD which supports lineinterleaved Stereo try the option
-Dstereomode=lineinterleaved - for video see-through you need a firewire camera and the ServiceVideoGrabber? then you can start the Viewer with following option:
-Dvideobackgound=yes
Lesson 3: the Viewer & tangible UIs
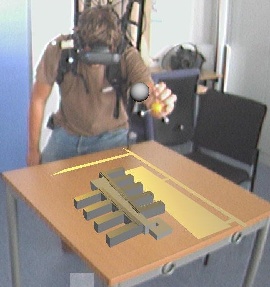
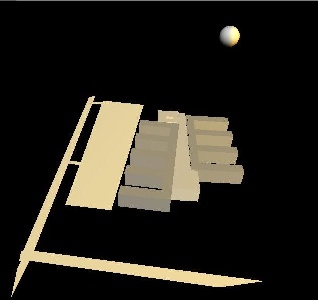
In this lesson you will see how the Viewer works together with the ART tracking system and Tangible UIs. A tangible (real) sphere is used to move a virtual "sun" in the Scene which illuminates a model of the TUM building in Garching. For this Lesson you need the ART tracking system and a "real sun" target. If this is not available for you the ServiceManualTracker can be used to simulate tracking data.What to build
Make sure you have a built and installed DWARF distribution. In particular, for this tutorial, you need:- Tutorial specific xmls and binaries (in src/tutorials/ui/tutorial3)
- ServiceVideoGrabber? (in src/services/VideoGrabber)
- The 3D model (in applications/archie/ui)
Running the example
Go to your install directory.- In a terminal window, type
run-servicemgr. - In a new terminal type
./VideoGrabber - In a new terminal type
./runViewer-Tutorial3.sh
ThingID=Sun and ThingType=6DObject to simulate tracking data.
Now watch how the sphere moves according to your movements and see how lightning changes when the sphere is turned around.

Lesson 4: the Viewer & UserInterfaceController? pt.2
In this lesson we will load a scene into the the Viewer using speech recognition? and the UserInterfaceController?. This example can be easily extended to add arbitrary objects to the scene and control them with tangible devices (TODO).What to build
Make sure you have a built and installed DWARF distribution. In particular, for this tutorial, you need:- Tutorial specific xmls (in src/tutorials/ui/tutorial4)
- ServiceSpeechRecognitionAdapter? (in src/services/SpeechRecognitionAdapterJAVA/)
- The 3D model (in applications/archie/ui)
- ServiceUIC? (in src/tutorials/ui/UIC)
Running the example
Go to your install directory.- In a terminal window, type
run-servicemgr.
